Using SQL Editor
Run a single SQL query
Supports :
This section explains how to execute an SQL query on SQL Editor.
- Connect to database.
- On the main menu bar, go to File>New>SQL Editor. Or, simply click [SQL Editor] or press Ctrl+N.
- Write SQL.
- Click [Run] or press F5.

Note: To view the table, right-click on a table and select [Open Description Pane], or select a table and press F4.
- On the Data tab on the bottom, check the query result.
Note: >>>'Autocommit' is activated as default.
Run Multiple Queries At Once
Supports :
This section explains how to run multiple queries simultaneously from SQL Editor.
- Connect to database.
- On main menu bar, go to File>New>SQL Editor. Or, simply click [SQL Editor] on the toolbar or press Ctrl+N.
- Write SQL on multiple SQL Editors. Use semicolon(;) to separate the tables.
- Click [Run] or press F5.
- On the Data tab, check the generated query result.

Run a Subquery
Supports :
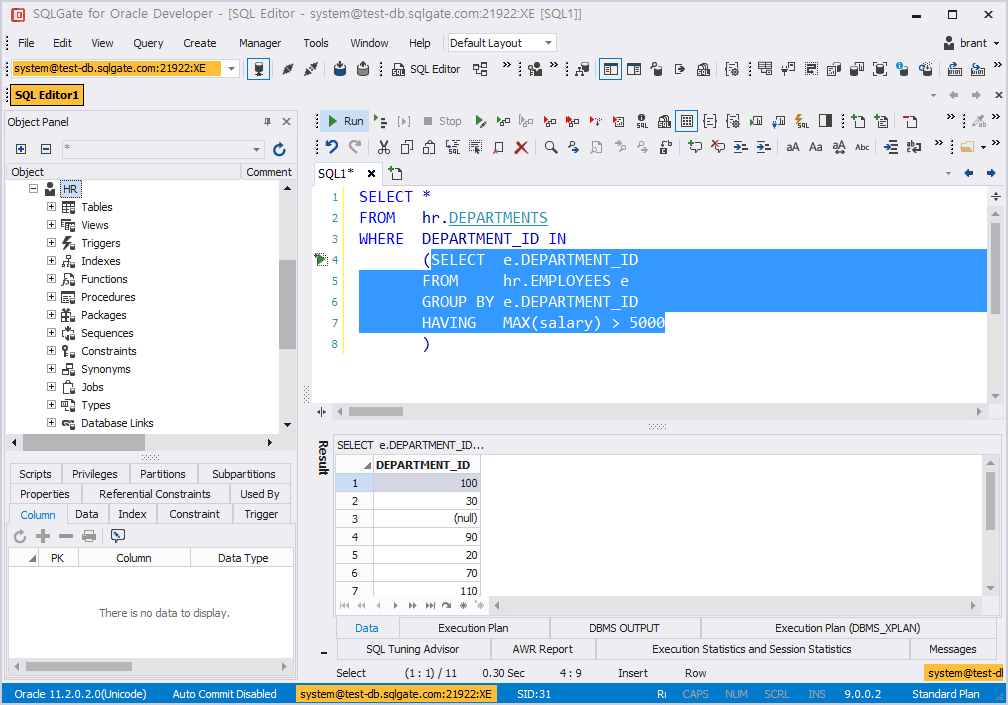
This section explains how to run a subquery block on SQL Editor.
- Connect to database.
- On the main menu bar, go to File>New>SQL Editor. Or, simply click SQL Editor on the toolbar or press Ctrl+N.
- In the SQL editor, create an SQL statement that contains a subquery.
- When you click a subquery, the background color changes automatically, and you can run them without blocking.
- On the Toolbar, [Run SubQuery Block (Alt+F5)] button will be activated.
- You can either click [Run SubQuery Block] or press Alt+F5.
- On the Data tab, check the generated subquery result.

Run A Single Query from Multiple Queries
Supports :
This section explains how to run one query from multiple queries on SQL Editor.
- Connect to database.
- On the main menu bar, go to File>New>SQL Editor. Or, simply click [SQL Editor] on the Toolbar or press Ctrl+N.
- Enter multiple SQL statements on SQL Editor.
- Place the cursor on the query to execute.
- On the main menu bar, go to Query>Run Current SQL. Or, click [Run Current SQL] on the Run Toolbar or press Ctrl+F5 or Ctrl+Enter.
- Check the query result on the Data tab.

Replace Selection At Once
Supports :
This section explains how to replace column names at once.
- Connect to database.
- On the main menu bar, go to File>New>SQL Editor. Or, simply click [SQL Editor] on the New Toolbar or press Ctrl+N.
- Write SQL on SQL editor.
- Left-click and highlight the SQL statements to edit.
- Click the icon that appears on the left.
- When you select the part you want to modify, a text box appears in the SQL statement to which the batch change will be applied. If you modify it, the contents of all the text boxes change at once.

Run and Modify Current SQL
Supports :
This section explains how to run query in SQL Editor and edit it right away.
- Connect to database.
- On the main menu bar, go to File>New>SQL Editor. Or, simply click [SQL Editor] on the New Toolbar or press Ctrl+N.
- Write SQL.
- On the main menu bar, go to Query>Run and Modify Current SQL. Or, click [Run Current SQL] on the Run Toolbar or press F6.
- Check the result.
- Double-click the data to edit and make changes.
- Click [Save Record].

Add Data
Supports :
This section explains how to add data on the result window.
- Click [Add Record] on the result window navigator.
- Empty record will be added on the bottom.
- Enter data.
- Click [Save Record].
- Click [Refresh] and check the result.

Delete Data
Supports :
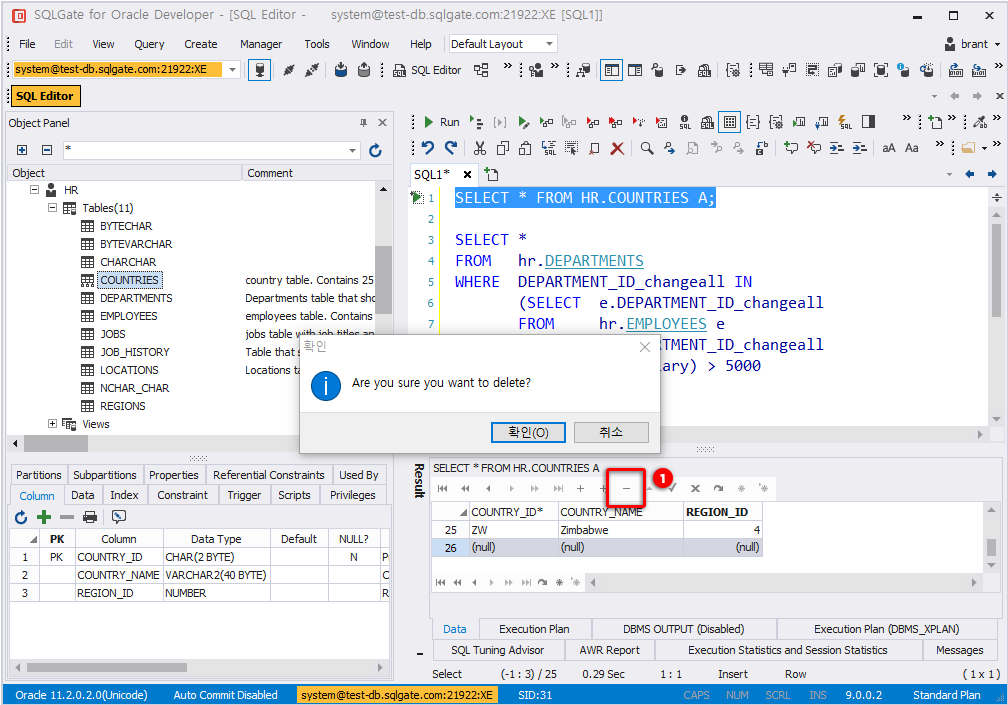
This section explains how to delete data on the result window.
- Click the data to delete.
- Click [Delete Record] on the navigator on the result window.
- When the message "Are you sure you want to delete?" appears, click [OK].
- Click [Refresh] and check the result.

Work with SQL History
Supports :
This section explains how to work with SQL History.
- Connect to database.
- On the main menu bar, go to View>SQL History. Or, simply click [SQL History] on the Toolbar or press F8.
- Select [Reuse] on SQL to reuse.
- Double-click or click [Add] on Navigator Editor, or press Ctrl+Enter.
- Check the result on SQL Editor.

Note: SQL is saved in a group SQL History, and procedures and functions are saved in Procedure/Function History.
List of Shortcut Keys of SQL History
Supports :
Shortcut keys to SQL History are shown below.
| Button | Instructions | Shortcut keys | Action |
|---|---|---|---|
| Expand Group | Shows subgroups | ||
| Collapse Group | Collapses to root group | ||
| New Group | Create a new group | ||
| Modify Group | Change the name of the user group. | ||
| Delete Group | Delete the user group. | ||
| Add SQL | Add a new SQL. | ||
| Modify SQL | Make changes in selected SQL. | ||
| Delete SQL | Del | Delete selected SQL | |
| Move Group | Move the selected SQL Group | ||
| Add to editor | Ctrl+Enter | Add the selected SQL to SQL Editor. | |
| Replace in editor | Delete current SQL and replace them with the selected SQL. | ||
| Paste to New Tab | Paste the selected SQL to the New Tab in SQL Editor. | ||
| Copy to Clipboard | Ctrl+C | Copy the selected SQL to Clipboard. | |
| Delete all SQLs in current group | Delete all SQLs in the selected group. | ||
| Open File | Open SQL History file. | ||
| Save as File | Save SQL History as file. | ||
| Find | Find SQL in SQL History |
Use Bind Variables to Run SQL
Supports :
This section explains how to perform SQL using bind variables.
- Connect to database.
- On the main menu bar, go to File>New>SQL Editor. Or, simply click [SQL Editor] on the Toolbar or press Ctrl+N.
- On the Toolbar, click [Use Bind Variables(:)].

- Write SQL using bind variables.
- Click [Run] or press F5.
- On the window given, enter the values.

- Click [Ok] to check the query result on the Result tab.

Use the Substitution Variable to Run
Supports :
This section explains how to run using substitution variables.
- Connect to database.
- On the main menu bar, go to File>New>SQL Editor. Or, simply click [SQL Editor] on the Toolbar or press Ctrl+N.
- On the Toolbar, click [Use Substitution Variable(&)].

- Write SQL using substitution variable.
- Click [Run] or press F5.
- On the window, enter values.
- Click [Ok] and check the query result on the Result tab.


